
what is try square ?
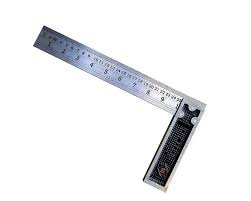
A try square is a measuring tool used in woodworking and metalworking which is used to check the accuracy and squareness of edges and corners by aligning the blade with the surface being measured, ensuring a 90-degree angle.It consists of a metal blade and a perpendicular handle.
It is valuable tools for maintaining precision and accuracy in various woodworking and metalworking tasks. They are often used to mark and measure right angles, establish straight lines, and check the squareness of joints and assemblies.
Must Read : Combination Set
try square diagram
Parts of Try Square

A try square consists of several parts, including:
- Blade: The blade is the straight metal piece of the try square, typically made of steel. It has a precise 90-degree angle at one end, used to check squareness. The blade may feature measurement scales or markings for accurate measurements and layout work.It can vary in length, typically ranging from 6 to 12 inches (15 to 30 centimeters).
- Handle or Stock: The handle, also known as the stock, is attached to the blade at the other end, perpendicular to it. It provides a grip for the user and serves as a reference surface for measuring squareness.
- Face: The face refers to the flat surface of the handle or stock that is perpendicular to the blade. It provides a reference surface for checking squareness against edges or corners.
- Rivets or Fasteners: These are the components that secure the blade to the handle or stock, ensuring a sturdy and reliable connection.
- Markings or Measurement Scales: Some try squares may have measurement scales or markings on the blade, allowing for precise measurements and layout work.
In a try square, the thinner part is indeed called the blade, while the thicker part is called the stock. They are set at a 90-degree angle to each other, forming a right angle.
The surface of the blade is commonly marked with units of measurement such as millimeters (mm), centimeters (cm), or inches (in). These markings help with accurate measurements and layout work, allowing users to precisely determine the dimensions of the workpiece or mark specific points.
types of try square
There are a few different types of try squares available, each with its own features and uses. Here are some common types:
- Standard Try Square: This is the most common type of try square. It features a straight blade set at a 90-degree angle to the stock, allowing for precise squareness measurements and marking right angles.
- Adjustable Try Square: An adjustable try square has a movable blade that can be locked in different positions along the stock. This feature enables the tool to be used for measuring and marking angles other than 90 degrees, making it more versatile for various woodworking and metalworking tasks.
- Engineer’s Try Square: Engineer’s try squares are larger and typically have longer blades compared to standard try squares. They are commonly used in mechanical engineering and metalworking applications where more extensive measurements and markings are required.
- Double Square: A double square combines the functionality of a try square with a center-finding square. It has two blades set at a 90-degree angle to each other, allowing for both squareness measurements and finding the center of a workpiece.
- Combination Square: Although not strictly a try square, a combination square includes a try square as one of its components. It consists of a ruler or blade that can be attached to different heads, including a try square head, allowing for various measuring, marking, and layout tasks.
These are just a few examples of the types of try squares available. The specific type you choose will depend on the requirements of your project and the level of versatility you need from the tool.
Various grades of try squares and their uses
Try squares can be categorized into different grades based on their accuracy and quality.
1. Grade A Try Square: These are the most precise try squares. They have a high level of accuracy, with blades that are flat to within 0.001 inches per inch. Grade A try squares are ideal for professionals who need precise measurements, such as machinists and engineers. They are usually made of durable hardened steel.
2. Grade B Try Square: These try squares are slightly less accurate than Grade A. They have a flatness tolerance of 0.002 inches per inch. Grade B try squares are commonly used in general woodworking tasks and are suitable for carpenters and hobbyists. They are often made of stainless steel or aluminum, making them lightweight and easy to use.
3. Grade C Try Square: These try squares are the least accurate. They have a flatness tolerance of 0.003 inches per inch. Grade C try squares are suitable for rough woodworking tasks and are commonly used by beginners. They are often made of plastic or low-grade steel, making them affordable and lightweight.
In summary, the different grades of try squares offer varying levels of accuracy and are used by professionals and hobbyists based on their specific measurement needs and the quality of work they require.
How to Use a Try Square
Using a try square is a straightforward process. Here are the steps to follow:
- Select the Workpiece: Choose the edge or corner of the workpiece that you want to check for squareness or measure.
- Position the Try Square: Place the try square against the selected edge or corner, ensuring that the blade is in contact with the surface you want to measure.
- Align the Blade: Align the blade of the try square with the edge or corner being measured, making sure it rests firmly against the surface. Ensure that the blade is perpendicular (at a 90-degree angle) to the reference surface.
- Verify Squareness: Look closely at the alignment between the blade and the workpiece. Check if the blade forms a perfect right angle with the reference surface. Ensure there are no gaps or misalignments between the blade and the workpiece.
- Mark or Measure: Once you have verified that the edge or corner is square, you can proceed with marking or measuring. Use the blade or the stock of the try square as a guide to make accurate lines or measurements on the workpiece.
- Repeat as Needed: If you need to check squareness or measure multiple edges or corners, repeat the process by repositioning the try square accordingly.
Remember to maintain a steady grip on the try square while using it and avoid any unnecessary movements that could affect the accuracy of your measurements. Following these steps will help you effectively use a try square for measuring and checking squareness in your woodworking or metalworking projects.
How to Check the Accuracy of a Try Square?
To check the accuracy of a try square, you can follow these steps:
- Prepare a Reference Surface: Find a known straight edge or a reliable square that you can use as a reference surface. This can be a flat piece of wood, a metal ruler, or another trusted square.
- Align the Try Square: Place the try square against the reference surface, ensuring that the blade of the try square is in contact with the surface.
- Check for Squareness: Examine the alignment between the blade of the try square and the reference surface. Look closely for any gaps or misalignments.
- Rotate and Repeat: Rotate the try square around its blade while keeping it in contact with the reference surface. Repeat the examination at various points along the blade.
- Verify Consistency: As you rotate the try square, observe if the blade consistently maintains a flush and tight contact with the reference surface. If there are any significant gaps or inconsistencies, it indicates a lack of accuracy.
- Measure with Another Square (Optional): For an additional check, you can use another trusted square to compare its squareness against the try square. Place both squares against each other to see if they form a perfect right angle.
By following these steps, you can assess the accuracy of your try square. If you notice any significant discrepancies or inconsistencies, it may be necessary to adjust or replace the try square to ensure precise measurements and squareness in your woodworking or metalworking projects.
Why is Accuracy Important in Try Square?
Accuracy is important in a try square because it allows for precise measurements, verifies squareness, ensures consistency, supports quality control, and reflects professionalism in the work. An accurate try square is an essential tool for achieving precise and high-quality results in various projects.
Precautions While Using Try Square
When using a try square, it’s important to take certain precautions to ensure accurate measurements and maintain safety. Here are some precautions to consider:
- Handle with Care: Treat the try square with care to avoid any damage or misalignment. Avoid dropping or mishandling it, as this can affect its accuracy.
- Check for Squareness: Before using the try square, check its squareness by aligning it against a known straight edge or another reliable square. This helps ensure that the tool itself is accurate.
- Secure the Workpiece: When using the try square to mark or measure, ensure that the workpiece is securely held in place. This prevents any movement or shifting that could lead to inaccurate measurements.
- Positioning: Hold the try square firmly against the edge or corner you are measuring, ensuring full contact between the blade and the workpiece. Maintain steady pressure to prevent any gaps that may affect the accuracy of the measurement.
- Lighting Conditions: Adequate lighting is crucial for accurate measurements. Make sure you have sufficient lighting to clearly see the markings on the try square and the workpiece. Shadows or poor visibility can lead to inaccurate readings.
- Avoid Parallax Errors: When reading the measurement markings, ensure that your line of sight is perpendicular to the markings. Viewing them from an angle can introduce parallax errors, resulting in inaccurate measurements.
- Clean and Maintain: Regularly clean the blade and markings of the try square to remove any dirt or debris that may affect its accuracy. Keep it stored in a dry place to prevent rust or corrosion.
By following these precautions, you can ensure accurate measurements and prolong the lifespan of your try square. Remember to prioritize safety and precision when working with any measuring tools.
application of try square
The try square has various applications in woodworking and metalworking:
- Checking squareness: It is used to verify if an edge or corner is at a perfect 90-degree angle, ensuring accurate joinery and assembly.
- Marking and layout: Try squares are used to create straight lines and mark right angles on workpieces for cutting, drilling, and shaping.
- Machine setup: They are useful in aligning machine components and ensuring perpendicularity between the workpiece and cutting tools.
- Checking flatness: Try squares can help assess the flatness of surfaces by comparing the alignment of the blade against the workpiece.
- Quality control: They are employed in quality assurance processes to inspect finished products and ensure they meet required specifications.
Overall, the try square is a versatile tool that plays a crucial role in achieving precision and accuracy in various woodworking and metalworking tasks.
advantages of try square
The try square offers several advantages in woodworking and metalworking:
- Accuracy: Try squares provide precise measurements and help ensure the accuracy of angles and corners, resulting in precise joinery and assembly.
- Squareness verification: They allow quick and easy verification of squareness, ensuring that edges and corners are perpendicular and meet the desired specifications.
- Versatility: Try squares can be used for a wide range of applications, such as marking, layout, machine setup, and quality control, making them a versatile tool in the workshop.
- Ease of use: With a simple design and straightforward operation, try squares are user-friendly tools that can be used by both professionals and hobbyists.
- Durability: Made from sturdy materials like steel or aluminum, try squares are built to withstand wear and tear, ensuring long-lasting performance and reliability.
- Portability: It is often compact and lightweight, making them easy to carry and use on-site or in different work environments.
- Cost-effective: It is generally affordable tools, offering excellent value for their functionality and durability.
By offering accuracy, versatility, and ease of use, try squares play a vital role in achieving precise and high-quality results in woodworking and metalworking projects.
disadvantages of try square
While try squares have many advantages, there are a few potential disadvantages to consider:
- Limited range: It is primarily designed for measuring and verifying 90-degree angles. They may not be suitable for measuring or verifying angles other than right angles.
- Size restrictions: The size of the try square’s blade can limit its use in certain situations, especially when measuring or marking in tight spaces or on larger workpieces.
- Limited functionality: It is specialized tools that primarily focus on squareness verification. They may not offer additional features or functionalities found in more advanced measuring tools.
- Potential for damage: If not handled and stored properly, the blade of a try square can become blunt or damaged, affecting its accuracy. Care must be taken to protect and maintain the tool.
- Dependency on user skill: Like any measuring tool, the accuracy of a try square relies on the user’s skill and technique. Inaccurate use or improper positioning can lead to measurement errors.
- Not suitable for all materials: Try squares are most commonly used in woodworking and metalworking. While they can be used on other materials, their design and construction may not be optimal for certain materials or applications.
It’s important to consider these potential disadvantages alongside the advantages of a try square to determine if it is the right tool for your specific needs and requirements.
Reference : https://en.wikipedia.org/wiki/Try_square