In this article we are going to learn about Depth Micrometer with special focus on Parts, Diagram, and Least Count. We will also learn how to take measurement and how to correctly read the measurement on the scale.
What is Depth Micrometer ?
A depth micrometer is a sensitive tool that is used to measure the depth of small holes and bores. Used by engineers and mechanics, this device has a series of unique pieces that help it dial in an exact measurement. Reading depth micrometers is a precise science that must be performed carefully.
Depth micrometer is an instrument used for measuring depth of holes to an accuracy of 0.01 mm and 0.001 in. Depth micrometer can only be used in places where there is a satisfactory seating for the instrument head, and the bottom of the hole being measured is parallel with the seating.
It (micrometer depth gauge) is used to measure the depth of holes, slots and recessed areas.
Depth Micrometer Parts
It consists of the following parts as shown in the figure.
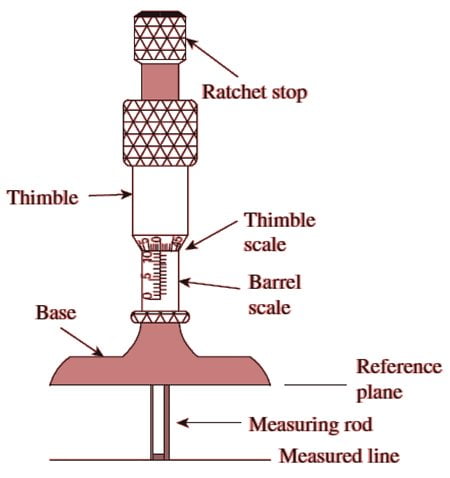
1. Micrometer head
2. Screwed spindle : This spindle does the actual measuring.
3. Graduated sleeve : This has the datum line and fixed graduations which are numbered 0,9,8,7, etc. reading from left to right.
4. A tubular cover : This is known as the thimble fastened with the spindle at its outer end and moves with the spindle.
5. Ratchet stop : A small extension to the thimble.
6. Locking ring: This is to lock the instrument at any desired setting.
In use, the spindle is screwed back to a point where it will clear the bottom of the hole being gauged. The instrument head is then placed across the top of the hole and held there whilst the spindle is screwed down until it just contacts the work.
Depth Micrometer Least Count
Depth micrometer used to measure the depth of an object with precision and accuracy with least count of 0.01 mm. The measuring span is 25 mm just like in micrometer, that can change by changing upsetting rod.
The principle of measurement similar to that of an external micrometer. Each depth micrometer is supplied with three interchangeable spindles and thus has the measuring ranges 0 to 25 mm, 25 to 50 mm, 50 to 75 mm and 75 to 100 mm. Depth micrometers are available with measuring ranges of 50 to 75, 75 to 175, 175 to 600, 650 to 1,250, 800 to 2,500, 1,250 to 4,000, 2,500 to 6,000, 4,000 to 10,000 mm.
Depth Micrometer Working
As it is used to measure the depth of holes, slots and recessed areas.
It is made up of a base (measuring face) that is attached to the barrel and a measuring spindle that is attached with a thimble, as shown in Fig. The axial movement of the spindle is accomplished by rotating the thimble.

The measurement is taken between the spindle’s end face and the measuring face of the base. As the spindle moves away from the base, the measurement increases because the barrel’s scales are reversed from normal.
The scale indicates zero when the spindle is flush with the face and maximum when the spindle is fully extended from the base. The use of a depth micrometer is depicted in Figure.
The main scale reading is 17. The 14th division line of the thimble corresponds to the reference line. As a result, the thimble reading is Total reading= 17 + 0.14 = 17.14 mm
The depth micrometer is available in two ranges: 0 -25 mm and 0-50 mm. By using extension rods in 25 mm increments, the range can be increased up to 0-90 mm. By removing the spindle cap, you can easily insert the extension rod.
How to Use a Depth Micrometer
Step 1 :- Insert the spindle
Make sure the micrometer is zeroed first by inserting the 0-25mm (or 0-1′′) rod and following the instructions in the section on zeroing your micrometer.
Using a rule or tape measure, estimate the distance to be measured. Using this estimate, choose the appropriate extension tube and insert it into the micrometer’s bottom.
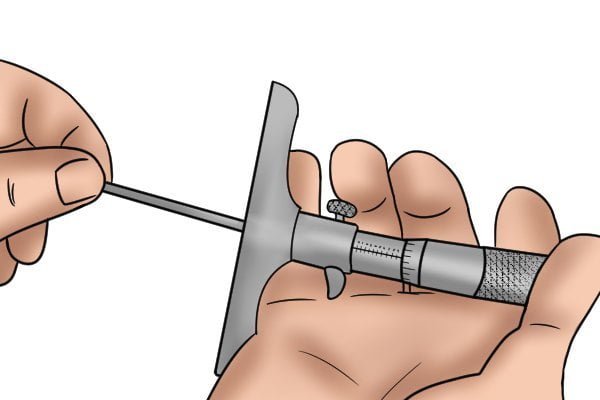
Step 2 :- Position

Insert the measuring rod as close to the edge (but not touching) as possible into the hole or onto the step being measured.
Step 3 :- Turn Thimble Clockwise
Turn the thimble slowly and clockwise, holding the base of the micrometer, until the tip of the rod is close to the bottom of the hole or step.
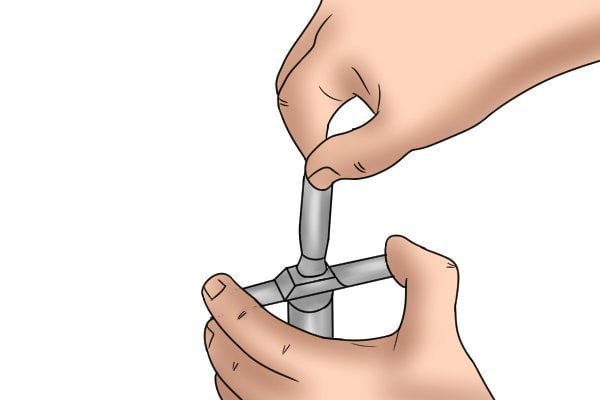
As you approach the surface to be measured, carefully turn the ratchet until the spindle stops rotating.

The ratchet will continue to turn, applying the proper amount of force for an accurate measurement.
Using the micrometer thimble alone requires some skill and practice to get the right “feel.”
Step 4 :- Lock Spindle

Step 5 :- Read the measured value, and add this to the length of the extension rod used.
How to Read Depth Micrometer
Micrometer measurements are a combination of the value shown on the sleeve scale and the value indicated on the rotating sleeve scale.
When using a micrometer with an additional Vernier scale, the value on the Vernier scale may also be considered.
How Do You Read a Depth Micrometer in MM?
Step 1 :- Look at Sleeve Scale
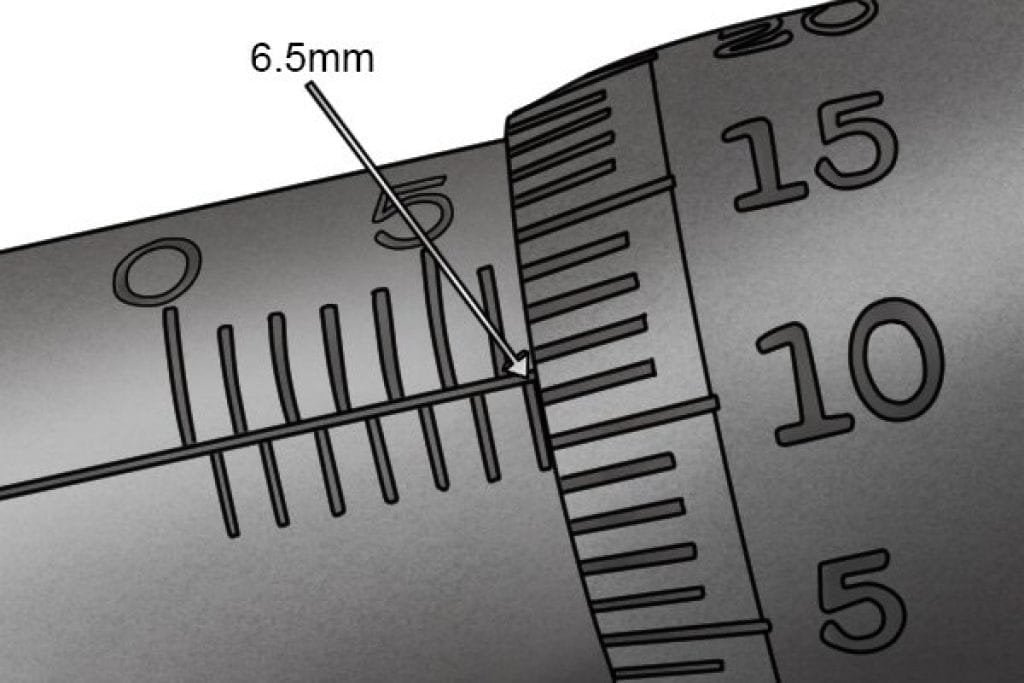
On the sleeve scale, you can find the value of the first significant figure of a measurement. This is the number directly to the left of the thimble.
This will be given in millimeters on a metric micrometer. On the sleeve scale, each minor increment represents 0.5mm.
In this case, the sleeve scale reading is 6.5mm.ns best with the index line on the sleeve scale.
Step 2 :- Look at the Thimble Scale

Then, read the value shown on the thimble scale.
The thimble scale of a metric micrometer has a range of 0.5mm (one complete revolution), with each increment representing 0.01mm and usually numbered in 0.05mm steps. The value is the lowest number that best aligns with the index line on the sleeve scale.
If the index line falls between two values, the reading will be the number immediately below the index line.
If this is the case, you should estimate the final part of the measurement or, if your micrometer has one, consult the Vernier scale. The thimble scale measures 0.11mm in this case.
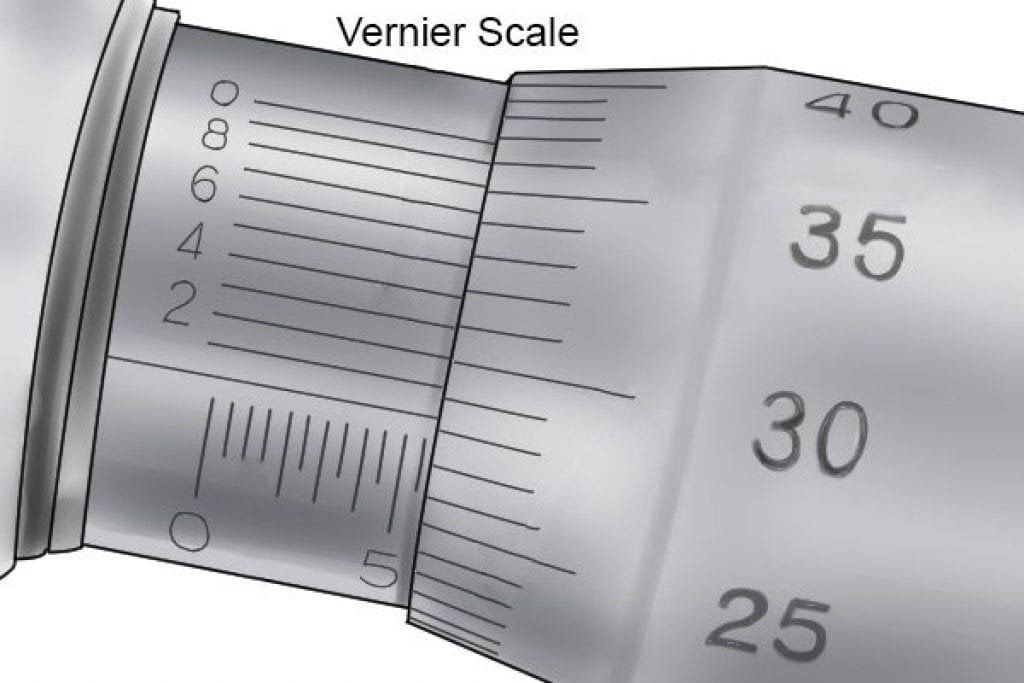
Step 3 :- Look at the Vernier Scale
If you have a Vernier micrometer, read the value shown on the Vernier scale (if you don’t have a Vernier micrometer or don’t need the accuracy, skip to Step 4).
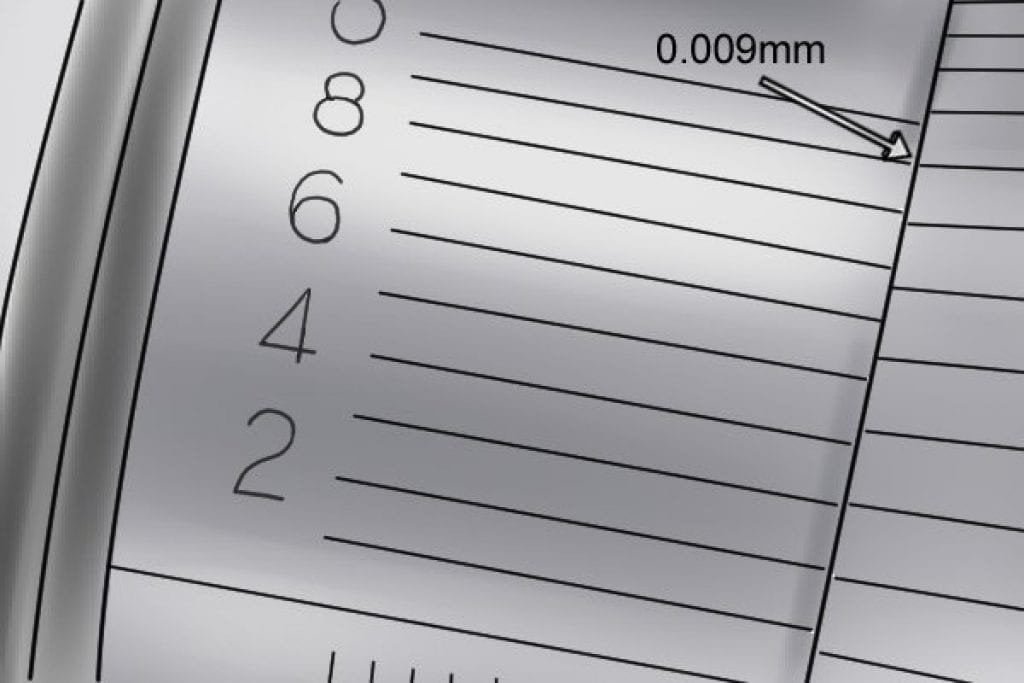
A metric micrometer’s Vernier scale has a measuring range of 0.01mm and is graduated in 10 increments. Each increment is equal to 0.001mm.
The reading on the Vernier scale corresponds to any increment on the thimble scale (0.009mm in the image on the left).
Step 4 :- Add Value Together

To get your total reading, add the values from each scale (sleeve + thimble + Vernier) together (sleeve + thimble + Vernier) = measured value).
For example, 6.5mm + 0.11mm = 6.66mm.
We can estimate the reading on the thimble scale to be 6.665mm because it fell roughly halfway between two values.
A Vernier scale, on the other hand, would provide a more accurate measurement of the smallest part of the measurement (0.005mm in this case).
Example of Reading Depth Micrometer
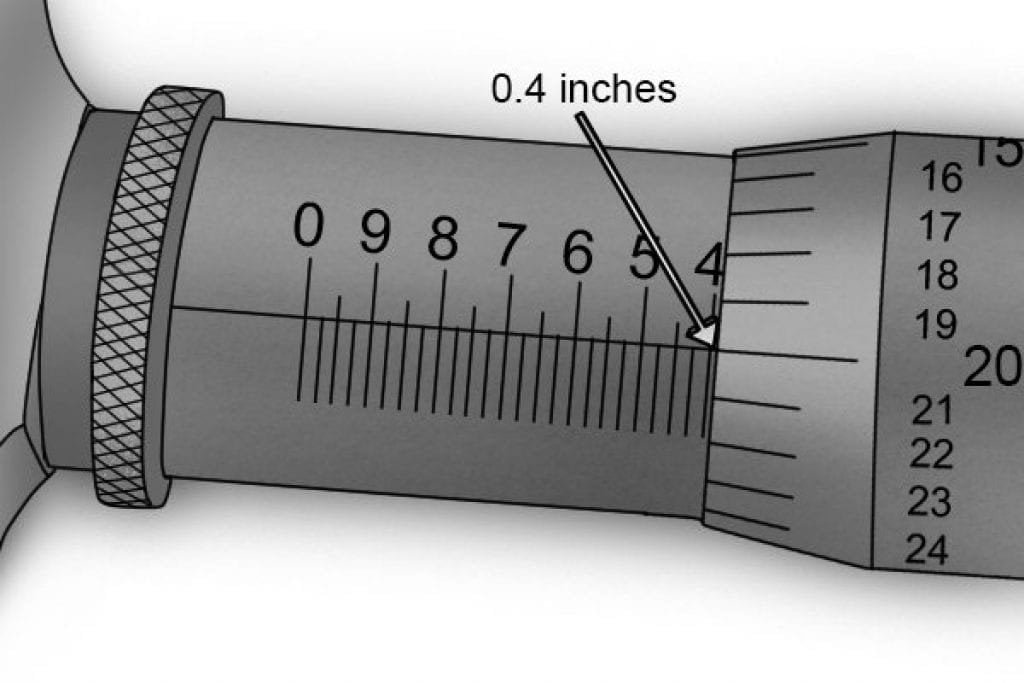
When reading a depth micrometer, the value shown on the main scale is the first number hidden by the thimble.
In this example, the first number hidden by the thimble is 0.4 inches.
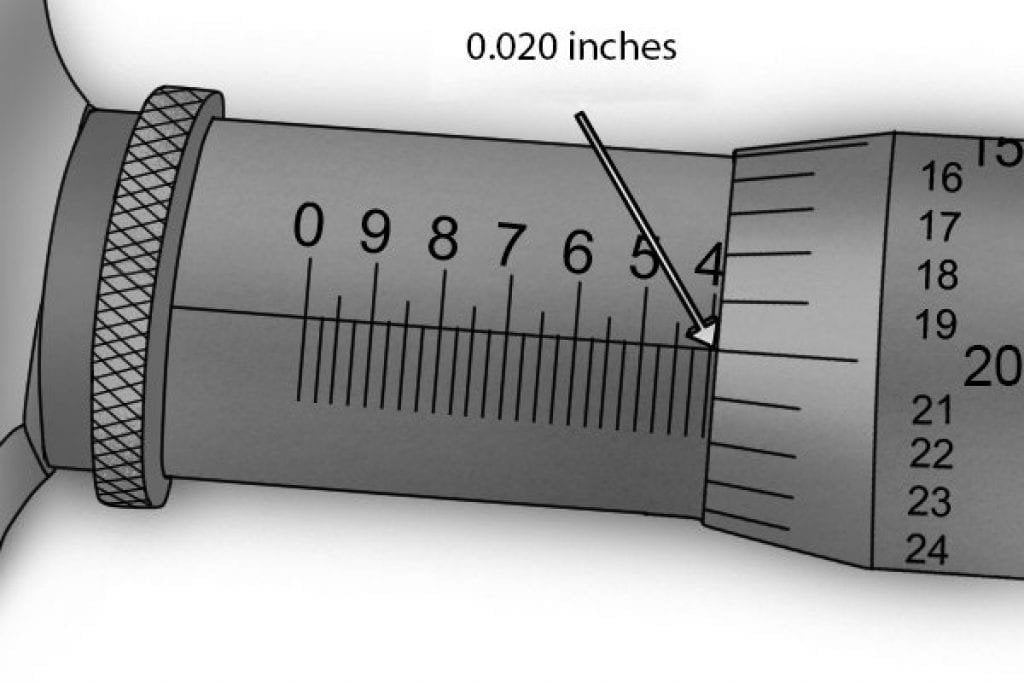
The thimble scale aligns with the index line at 0.020 inches.
So the complete reading is 0.4 + 0.020 = 0.420 inches.
So far we learnt all about the depth micrometer in detail on how to take the readings, its parts, Least Count and how to read the correct measurements. if you liked this article, please share it your friends.
Check Out Other Important Topics
Foundry Tools And Equipment – List, Names & Images
Sand Testing Methods – Full Process
Types of Casting Defects – Complete Overview
Moulding Sand – Properties, Types, Process, MCQs
Plant Layout – Types, Objectives, Principles, Advantages
| IC Engine | Important PDFs | Boilers | Synergy Maritime Exam | Naval Arch | MEO Class 4 |
| Interview Questions | Difference Between | Types of Pumps | Auxiliary Machines | Types of Valves | Home |